Task 1: Set Up My Toolset
Objective
To have the software tools necessary to apply GitHub Copilot to code assist prompt engineering.Development System
I developed this project on my iMac, running macOS 13 on a 3.4 GHz Quad-Core Intel Core i5, with 32 GB DDR4 memory and 1 TB storage.
Step 1. Get a GitHub Copilot Account
Before you start using GitHub Copilot, you must have:
- A GitHub account
- A GitHub Copilot subscription
To get a GitHub account, browse to https://github.com
Follow the instructions there to sign up for a personal GitHub account.
GitHub personal accounts are free.
After you have a GitHub account, browse to https://docs.github.com/en/copilot/quickstart.
Follow the instructions there to sign up for GitHub Copilot.
When I began this project, GitHub offered a free trial for a personal GitHub Copilot subscription.
YMMV.
Step 2. Install Python Latest
You do not need Python to use GitHub Copilot. But you do need it to do this project.
To download the latest Python release, browse to https://www.python.org/downloads.
Follow the instructions there to download and install Python.
I installed Python 3.12
Step 3. Install Microsoft Visual Studio Code Latest
You do not need VS Code to use GitHub Copilot. But you do need it to do this project.
To download the latest VS Code release, browse to https://code.visualstudio.com/download.
Follow the instructions there to download and install VS Code.
I installed VS Code 1.84.1
Step 4. Install and Configure VS Code Extensions
You do not need the following VS Code extensions to use GitHub Copilot. But you do need them to do this project.
To download the latest VS Code extensions, browse to https://code.visualstudio.com/docs/editor/extension-marketplace
Step 4.1 Install The Extensions
Follow the instructions there to download and install the following VS Code extensions.
- Python by Microsoft extension - I initially installed 2023.20.0
- Pylance by Microsoft extension - I initially installed 2023.11.0
- GitHub Copilot extension - I initially installed 1.134.0
- GitHub Copilot Labs extension - I initially installed 1.15.1019
- GitHub Copilot Chat extension - I initially installed 0.10.1
Step 4.2 Disable Auto Updating for All Extensions
Initially, I disabled Extensions Auto Update because I wanted a stable environment. Also, as a cyber security engineer, I'm always trying to minimize my attack surface.
However, when I observed my extensions set becoming outdated in a matter of days, I re-enbled Auto Update.
My cost-benefit analysis resolved that, for my Advanced Tech projects it was more desirable to maintain toolkit currency.
Step 4.3 Sign in to GitHub to Authorize VSCode
According to GitHub: the VS Code GitHub Copilot extension installer prompts you to sign in to GitHub in VS Code. This causes GitHub to request you Authorize Visual Studio Code.
You must authorize VS Code for GitHub Copilot to work in it.
Step 5. Validate the Toolkit
Step 5.1 Hello World from the GitHub Copilot web site
To ensure this toolset worked, I first did GitHub Copilot's own JavaScript Hello World, "Getting your first suggestion"
- Open VS Code
- In VS Code, create a JavaScript file
- In that file, typefunction calculateDaysBetweenDates(begin, end) Copilot suggests an implementation.
- Enter Alt+] or Option+] or Alt+[ or Option+[ repeatedly for alternate suggestions.
- To select a suggestion, in the line you just typed in, hit Tab
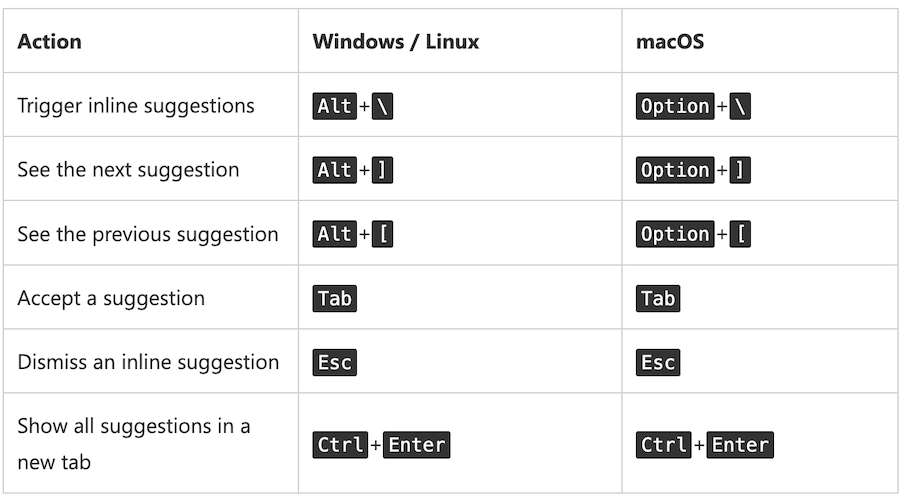
Enter Command+N then Command+K release then M
From the dropdown menu of coding languages, select JavaScript.

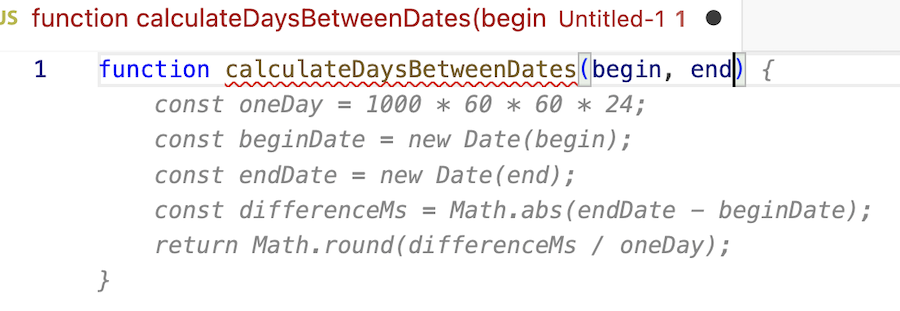


I like Suggestion 3 for its simplicity, completeness, and clarity.

You can now save or edit that code.
TIP: You can hit Ctl+Enter while in the type-it-here field to toggle a tab that contains all suggestions.
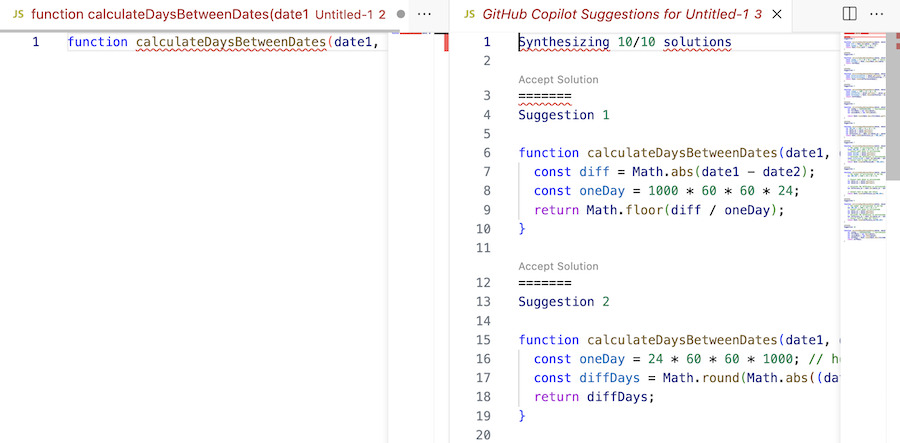
Step 5.2 Hello World from the Microsoft GitHub Copilot VS Code extension web site
Then I did the Python HW from The VS Studio GitHub Copilot installer
- Open VS Code
- In VS Code, create a Python file
- In that file, type def hello(): Copilot suggests an implementation.
- In the line you just typed in, hit Tab
Enter Command+N then Command+K release then M
From the dropdown menu of coding languages, select Python.


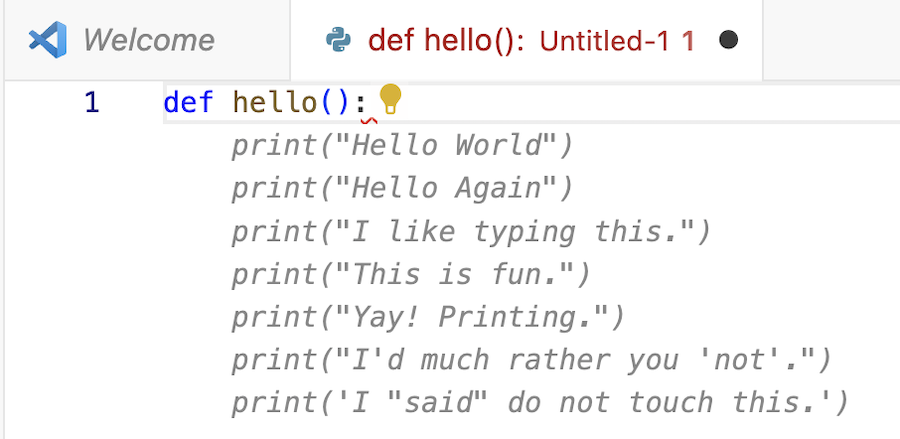
I like Suggestion 1 because it's what I normally use.

You can now save or edit that code.
Step 5.3 Hello World from the Book
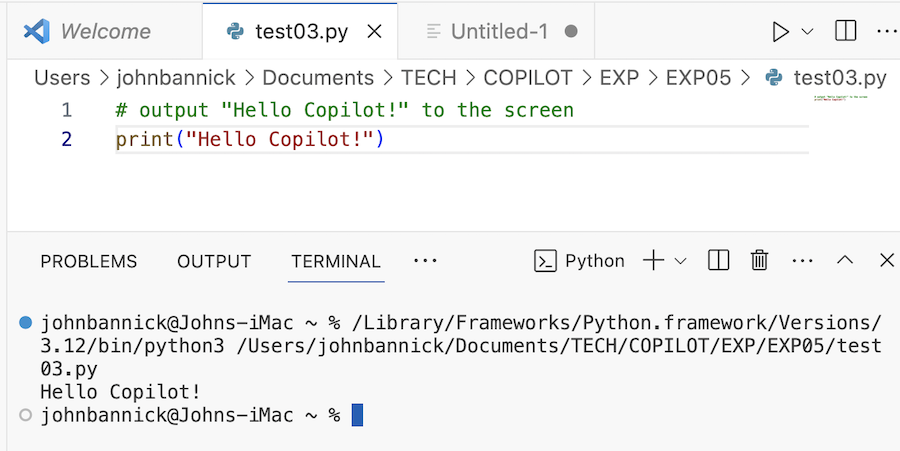
Then I did the Python HW from Learn AI-Assisted Python Programming with GitHub Copilot and Chat GPT Section 2.3.2 Check to see if your setup is working properly. Page 18.
- Open VS Code
- In VS Code, create a Python file
- In that file, type #output "Hello Copilot!" to the screenand hit ENTER >>> THIS IS A PROMPT ENGINEERING PROMPT <<<
- In the suggested line, hit Tab
- Save the file.
- Run the file by hitting the VS Code Run button

Enter Command+N then Command+K release then M
From the dropdown menu of coding languages, select Python.

No other useful suggestions suggest themselves.

Conclusions
The necessary software tools are installed, configured, and validated.
Note: For the first two examples, I did not utter a Prompt.Copilot used Code Completion.
The third example, from the book, is my first Prompt Engineering code for this side project. Yea!
Copilot has multiple ways to suggest code:
- Function Signatures: Type in the function signature and Code Pilot suggests implementations.
- Comments: Type in comments in the coding language you're using (Python here) and Code Pilot suggests implementations. This option is broader in scope and more abstract.

